Heroku Migration: Most Common Solutions

Heroku has long been a cloud platform as a service (PaaS) for deploying and maintaining scalable applications. It relieves developers of the hassle of setting up servers and maintaining infrastructure by providing a subscription-based, managed cloud environment.
PaaS, or Platform as a Service, is a unified set of cloud-based tools and resources for developing and deploying applications without the need to manage network infrastructure. PaaS is often offered through a subscription package where you get access to basic deployment tools to get your projects up and running. This eliminates the need to set up servers, storage, network services, runtime environments, and other requirements for running and administering cloud applications. The PaaS provider automatically handles these, allowing you to focus on developing outstanding applications. Like their on-premises counterparts, PaaS solutions contain software components that help you build, run, and debug applications. Some systems also allow you to work with other members of your team in the same environment. Despite its widespread use, Heroku has drawn criticism for its price (since November 28, 2022, Heroku service left only paid plans for users), performance, and other growth disadvantages. Heroku may not always be a fantastic solution, so migrating from Heroku to another cloud provider is a wise choice. Partnering with a SaaS consulting team can ensure a seamless and efficient migration process.
How to migrate from Heroku to another cloud provider
Heroku to AWS migration
Heroku is a platform that is actually built on top of AWS. Heroku takes carefully selected services and capabilities available on AWS and packages them into an effortless-to-use application development solution. The service provides and controls the tools - such as the operating system and databases - so an organization only has to worry about its own functions and data. AWS, on the other hand, delivers and manages the hardware, but the customer controls everything else, including the OS, databases, software stack, and all the data.
In order to migrate from one platform to another, you may use Qovery detailed guide, and you need to follow certain steps:
Create your Dockerfile or use Buildpacks
You can use Buildpacks or create a Dockerfile to compile and run your application from Heroku. Each of these choices creates a container image that can be run using the container engine.Generate resources on Qovery
You'll need to create an application and possibly a Database, which all starts in the Qovery Console. Once your application is created, it is not yet deployed. You can configure the CPU, memory, and environment variables before deployment. If you want to deploy it before the configuration is complete, you can click Actions > Deploy.Configure Environment Variables and Secrets
To extract your environment variables from Heroku, we recommend using the Heroku CLI and exporting all environment variables and secrets to an .env (dot env) file. You can then create the environment variables using the web interface or the Qovery CLI. After that, you can connect the front-end application to the back-end application, and an environment variable alias will be created for this. Then, you will need to connect the back-end application to your database.Copy data from your Heroku databases to your AWS databases
This functionality is not yet ready, but it will appear soon.Deploy your apps
Once you are in the console, go to the application panel and select " Deploy ".
Here are a few reasons why a company might decide to migrate from Heroku to AWS:
Usability: If you host other cloud services on AWS and need to keep everything in one place, migrating to AWS may be a more convenient option. Heroku restrictions can lead to some features working on Heroku and others on AWS. If so, you may decide to consolidate operations by working with one platform.
Pricing: Applications on Heroku run in containers called dynos, and you can only run one service on each dyno. Additional dynos have an extra cost, so if your applications grow to the point where you need a large number, the price may increase. With AWS, you only pay for what you use, and with large applications, this quickly becomes a cheaper option. AWS also offers a variety of cost optimization tools and services to keep costs under control.
Agility: A company may need the freedom to use development tools that are not available on Heroku - for example, .NET is not supported as a runtime, which immediately disqualifies it for Windows-based workloads. Because Heroku is a managed offering, applications built for Heroku configurations have certain limitations and may be difficult to port to other providers or services. Developing within these constraints forces hard choices that would not be possible on AWS and can have big consequences in the future.
Integration with third-party developers: Applications can rely on third-party add-ons that Heroku uses to support features ranging from email to analytics. Add-on vendors sometimes go out of business, leaving an app unsupported or inaccessible
Suppose you want to switch from Heroku to AWS. In that case, you can significantly improve your server performance and gain much more control over your software stack without having to incur tons of sysadmin overhead. Another significant advantage is portability - instead of being too tied to your existing hosting provider, you can easily deploy any other cloud infrastructure in the future.
Heroku to Render
If your main requirements are the availability of free services and an intuitive interface without 1000 buttons and menus, or if you are a beginner, then you should not overload yourself with complex functionality at once, so AWS, Azure, and GC are immediately out of the question. In this case, Render hosting is at your service with predictable, honest, and simple pricing options that you will definitely like.
So, let's take a step-by-step guide look at how to migrate from Heroku to Render:
Step 1. Generate a Dockerfile.render and render.yaml
Render has created a plugin for the Heroku CLI to reduce some of the manual migration steps. To install it, run the following command:
heroku plugins:install @renderinc/heroku-importNext, you need to install a CLI plugin that will read information about your application and its add-ons and create three files:
.render-buildpacks.json- specifies the set of application capabilities, wrapped up in buildpacks, that your application needs. The Render CLI sources it from the state of your currently-running application on Heroku.Dockerfile.render- allows you to build a Docker image to deploy on Render.render.yaml- infrastructure as code specifying Render how to run your service and any Postgres or Redis services your application needs.
And run the following command:
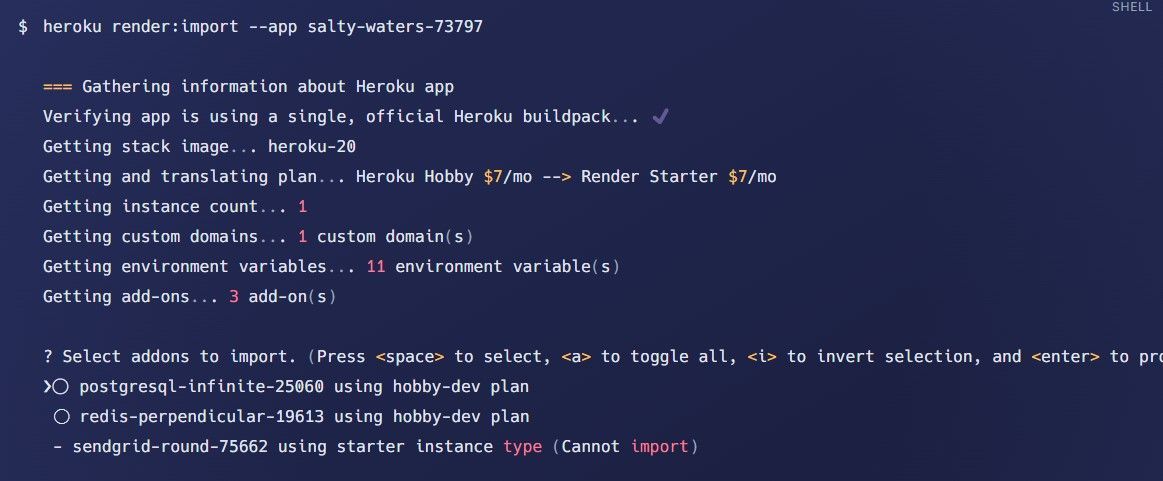
You will then be prompted to select the Heroku Postgres and Heroku Redis add-ons that you want to migrate to Render. Once selected, files will be created for you, and the following instructions will be shown.
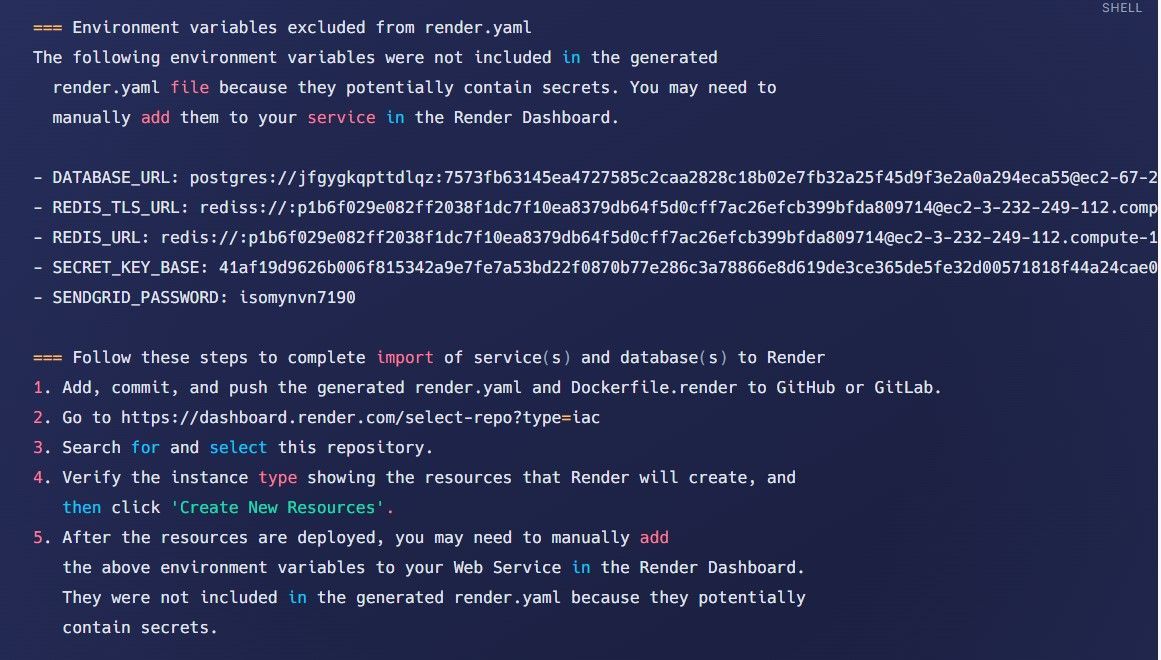
It is worth noting that the names of the environment variables (DATABASE_URL, HEROKU_ , KEY, PASSWORD, REDIS_URL, REDIS_TLS_URL, SECRET, TOKEN) are excluded from the generated render.yaml to reduce the likelihood that secret data will be added to the source code control.
Add .render-buildpacks.json, Dockerfile.render and render.yaml to Source Control with the following commands:

Step 2. Create Resources on Render
In the Render toolbar, select New+ and then Blueprint. Connect your GitHub or GitLab account to Render if you haven't already, and then find and select your repository.
Render will create an instance type to build and deploy your service, along with the Render PostgreSQL database and Render Redis service if your Heroku app used them and you selected them to import in the Launching the plugin CLI step above. Review the instance type, click Apply, and Render will create your resources.
Step 3. Configure Environment Variables
As mentioned in step 1, you may need to manually create environment variables that contain secret information using the Render Dashboard.
To create or update environment variables using the Render Dashboard:
Select Dashboard on the left
Select the service you just made from the list
Click the Environment tab and create or update environment variables
Step 4: Copy Data from PostgreSQL
If you have created a Render PostgreSQL database, you can copy data from your Heroku Postgres database to Render.
Put your Heroku app in maintenance mode so that no new data is written to the database during the copy. <HEROKU APP NAME> is a Heroku application that owns the Heroku Postgres add-on.
heroku maintenance:on --app <HEROKU APP NAME>Create a backup of the data in your Heroku Postgres database.
heroku pg:backups:capture --app <HEROKU APP NAME>Download the backup. This will download a file named latest.dump to your local computer.
heroku pg:backups:download --app <HEROKU APP NAME>Import latest.dump into your Render PostgreSQL database. <EXTERNAL CONNECTION STRING> can be found on your database's Render Dashboard page.
pg_restore --verbose --no-acl --no-owner -d <EXTERNAL CONNECTION STRING> latest.dumpStep 5: Update DNS Configuration
If your Heroku app uses a custom domain, follow the instructions to update your DNS configuration to point to Render instead of Heroku.
In case you are interested in how profitable it is to transfer from Heroku to Render, you should note that Heroku only supports Node.js, Ruby, Java, Scala, PHP, Python, Go, Clojure, and Docker containers out of the box, and there are nuances with them, as you need to create a heroku.yml and manually prescribe the steps of building the Dockerfile. Redner currently only supports the GitOps approach, but it's available on GitHub and GitLab. Out of the box, it supports Node.js, Python, Ruby, Elixir, Go, Rust, and Docker containers, meaning that Redner understands where the Dockerfile is located and starts building and deploying the container itself.
Another nice bonus in the user panel is the ability to deploy any previous version of its service, which opens up more maneuvers for experimentation. Render also has a simpler user interface with more built-in functionality. For simple projects, the whole setup takes 2 clicks, which will appeal to beginners since you don't need to spend an additional 2 months figuring out how to deploy your application.
Heroku to DigitalOcean
When evaluating a Heroku replacement, you should look for solutions that offer the ease of use of Heroku as well as address its issues. One strong alternative to Heroku is DigitalOcean App Platform. This service provides many of the benefits of Heroku at a cost-effective price point and with the added flexibility that allows developers to have more control over their deployments. As their applications scale, developers can easily migrate to more advanced infrastructure solutions, including our offerings. Fortunately, there are only 3 steps you need for Heroku to DigitalOcean migration:
Step 1. Setup your Server
First, you need to install CapRover and go to the DigitalOcean dashboard, and you will see it:

Now open your browser, type in http://IP-ADDRESS:3000, and log in with your default password: captain42. After logging in, you will see the following dashboard:

Step 2. Setup your Domain
You need to set up a wildcard record A in your DNS. If a domain name is registered, you can set up a wildcard record in your DNS settings. Then, you just add an A record pointing to your server. The host or name value should be *.vps , IP or value should be the IP address of your VPS. The type should be “A”. And TTL can be anything, usually 600sec.
Step 3. Final setup
Install the CapRover command line tool npm i -g caprover and run caprover serversetup.
As for the benefits you will receive after migration, Digital Ocean allows you to create a virtual private server. Even if the service provider doesn't manage it for you, handy guides are available to help you set up such servers. Unfortunately, Heroku does not offer this feature.
How to transfer Postgres data to Heroku
For the sake of objectivity, it is worth mentioning not only the disadvantages of hosting, but also the advantages that you can take advantage of when working with Heroku:
Ease of Use. As a leading platform as a service, Heroku is known for its ease of use. Developers can choose from several different tier packages, more suited to the complex requirements of large companies.
Focus on Developers. Heroku focuses on helping developers improve their skills to create feature-rich applications. Developers love using this environment because they get access to valuable tools that help speed up. The platform allows developers to focus on writing code rather than managing servers
Easy to Scale. Applications that receive huge amounts of traffic can easily handle the load by creating hundreds of instances of applications with literally one click. Heroku's auto-scaling feature makes it easy to detect sudden traffic spikes and creates additional Dyno accordingly. To ensure seamless scaling and efficient deployment of complex solutions, many businesses turn to a trusted SaaS application development company for guidance and support.
Security. Heroku offers developers a secure way to develop applications thanks to its security features. Heroku provides optimal server and application code security and prevents potential problems.
Despite its competitors, Heroku still remains a popular platform, so the issue of migration to heroku is also quite common, so let's take a closer look at this process:
Create Dump File
Create a dump of your local database in a compressed custom format using the open-source pg_dump utility:
# set the password in an environment variable
export PGPASSWORD=mypassword # linux/mac
set PGPASSWORD=mypassword # windows

# create the database dump
$ pg_dump -Fc --no-acl --no-owner -h localhost -U myuser -d mydb -f mydb.dump
Import to Heroku Postgres
For PG Backups to access and import the dump file, you must upload it somewhere using an HTTP address.
Heroku website suggests using Amazon S3 with a signed URL and create a signed URL using the AWS console:
aws s3 presign s3://your-bucket-address/your-objectUse the URL of the source file in the pg:backups restore command:
heroku pg:backups:restore '<SIGNED URL>' DATABASE_URL --app example-appDATABASE_URL is the HEROKU_POSTGRESQL_COLOR_URL of the database you want to restore to. To restore a database, you must specify a database configuration variable.
If you are using a Unix-like operating system, be sure to use single quotes around the temporary S3 URL, as it may contain ampersands and other characters that can confuse your command prompt. If you are using Windows, you must use double quotes. After completing the import process, delete the dump file from the repository if you no longer need it.
If you have any problems, the best option is to contact the experts. At Brights, we believe that implementing any changes with a partner who has the right experience and whom you trust allows companies to scale faster and be more flexible and ready for the challenges of today.

